It is open source. Thanks to that we can actually take a look inside project code. That is truly awesome for people who want to have deep knowledge of framework they are using. It is cross platform. It is a huge, thanks to that on can for example run our project on Linux. It is modular.
What is it?
The best definition is actually placed on project official web site. It says: “ASP.NET Core is a new open-source and cross-platform framework for building modern cloud based internet connected applications, such as web apps, IoT apps and mobile backends. ASP.NET Core apps can run on .NET Core or on the full .NET Framework. It was architected to provide an optimized development framework for apps that are deployed to the cloud or run on-premises. It consists of modular components with minimal overhead, so you retain flexibility while constructing your solutions. You can develop and run your ASP.NET Core apps cross-platform on Windows, Mac and Linux.”.
That is the definition. Now let’s concentrate on key points that should focus our attention. It is open source. Thanks to that we can actually take a look inside project code. That is truly awesome for people who want to have deep knowledge of framework they are using. It is cross platform. It is a huge, thanks to that on can for example run our project on Linux. It is modular. That is very important. Because thanks to that it can be very fast. Because we are able to only use modules that we actually need in our application. We are no longer forced to user entire haavy framework.
Installation
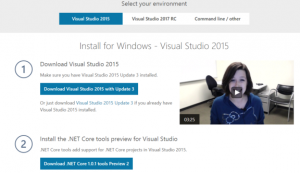
Installation in quite simple, to be honest. It takes only three steps. First of all we have to choose Visual Studio version. In my case it was Visual Studio 2015. Because it is a stable version at the moment of writing this article. And after that we only need to install Visual Studio Update and tools for “Core” Projects
Creating new project
When we are done with the installation process we are free to start working with ASP.NET Core. Like every other work also this one requires us to have a project. So let’s create one now. We chose File -> New -> Project -> Templates -> Visual C# -> Web -> ASP.NET Core Web Application (.NET Core).
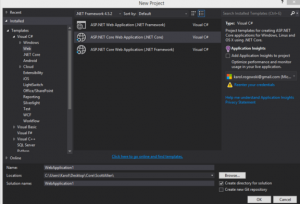
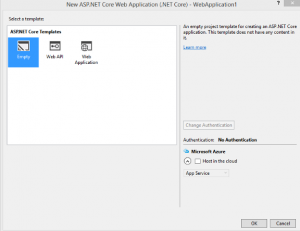
When this is done we have three options. To choose empty project, web API or Web Application. We are going to choose an empty project. Because we want to get to know how all the pieces work.
Project Layout
Now that we have created our project, let’s take a look what we have.
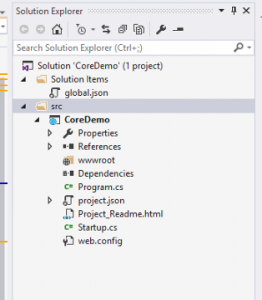
The project structure looks different from the file we got used to when creating ASP.NET MVC application. But don’t be scared. We will go step by step. First of all we need to take a look at global.json.
{
  "projects": [ "src", "test" ],
  "sdk": {
    "version": "1.0.0-preview2-003131"
  }
}
There are two elements worth mentioning. First off all “projects”. This element gives us information about the places, where source code off our application will be stored. At this point we only have the “src” folder and no “test” folder. No worries there folder with source code is enough to start. Second element is “version” this has detailed information about version of our application.
Now let’s take a look what is inside “src” folder.
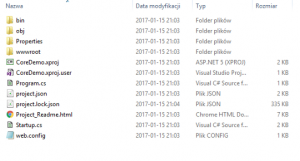
We should notice one thing when looking at this image. The set on files is identical to those that we see inside Visual Studio. That is very important thing about this solution. In this version is a file is in project folder it get “included” in project. That is something new. Because in previous version we were forced to manually add new files to solution projects. Now there is no such need. If we add something to the folder it gets added to the project. And other way around. If we remove something from folder it gets removed from solution project.
project.json file
Now let’s take a look at second json configuration file.
{
  "dependencies": {
    "Microsoft.NETCore.App": {
      "version": "1.0.1",
      "type": "platform"
    },
    "Microsoft.AspNetCore.Diagnostics": "1.0.0",
    "Microsoft.AspNetCore.Server.IISIntegration": "1.0.0",
    "Microsoft.AspNetCore.Server.Kestrel": "1.0.1",
    "Microsoft.Extensions.Logging.Console": "1.0.0"
  },
  "tools": {
    "Microsoft.AspNetCore.Server.IISIntegration.Tools": "1.0.0-preview2-final"
  },
  "frameworks": {
    "netcoreapp1.0": {
      "imports": [
        "dotnet5.6",
        "portable-net45+win8"
      ]
    }
  },
  "buildOptions": {
    "emitEntryPoint": true,
    "preserveCompilationContext": true
  },
  "runtimeOptions": {
    "configProperties": {
      "System.GC.Server": true
    }
  },
  "publishOptions": {
    "include": [
      "wwwroot",
      "web.config"
    ]
  },
  "scripts": {
    "postpublish": [ "dotnet publish-iis --publish-folder %publish:OutputPath% --framework %publish:FullTargetFramework%" ]
  }
}
This file is the heart and soul of our application.
First let’s take a look at the “dependencies” section. It is this section that tells us what our application is able to do. Our dependencies are being managed by the NuGet package manager. As we know NuGet packages can do all kinds of stuff. From generating HTML to connecting to Database.
Another important element is the “frameworks”. This section informs us about the runtime and the imports. In this section for example we can define how we want our application to run in full .NET framework.
As the last element of this article I want to show to the “References” folder looks in this project.
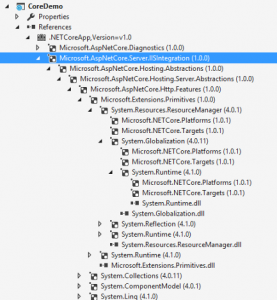
In this “References” we can see all the dependencies. It is very useful if we want to know what depends on what. Great material to learn new framework.
Karol Rogowski

